By: Team W10-3 Since: JAN 2019 Licence: MIT
- 1. Introduction
- 2. About This User Guide
- 3. Quick Start
- 4. Features
- 4.1. Viewing help :
help - 4.2. Adding an equipment:
add-e - 4.3. Creating a new work list:
add-w - 4.4. Putting an equipment into a work list:
put - 4.5. Removing an equipment from a work list:
remove - 4.6. Editing an equipment:
edit-e - 4.7. List all equipment:
list-e - 4.8. List all work list:
list-w - 4.9. Selecting an equipment:
select - 4.10. Selecting a client:
select-c - 4.11. Show in map:
display - 4.12. Sorting the equipment list:
sort - 4.13. Filtering the equipment list:
filter - 4.14. Autocomplete: tab [Coming in v2.0]
- 4.15. Deleting an equipment:
delete-e - 4.16. Deleting a work list:
delete-w - 4.17. Enabling notification:
notify[Coming in v2.0] - 4.18. Route planning:
route - 4.19. Listing entered commands:
history - 4.20. Undoing previous command:
undo - 4.21. Redoing all the previously undone command:
redo - 4.22. Clearing all entries:
clear - 4.23. Exit the program:
exit - 4.24. Saving the data
- 4.25. Encrypting data files
[coming in v2.0]
- 4.1. Viewing help :
- 5. FAQ
- 6. Glossary
- 7. Command Summary
1. Introduction
Equipment Manager is a desktop CLI (Command Line Interface) application that allows engineers to keep track on the Preventive Maintenance schedule of all Resuscitation Devices in singapore. It has a GUI (Graphic User Interface) that allows users to get further information on each equipment.
Our purpose is to help engineers plan the number of equipment that they would like to carry out preventive maintenance and keep track on each equipment details such as status, location and more information.
2. About This User Guide
Welcome to Equipment Manager User Guide!
This User Guide document will equip you with all the information you need in order to use the v1.4 application. Before reading this user guide,
this section will explain the key things to take note of.
If this is not a problem for you, jump to the Section 3, “Quick Start” to get started. If you already have Equipment Manager up and running, then head over to Section 4, “Features”. Enjoy!
2.1. Icons Meaning
The following section provides a quick understanding on each of the legends used throughout the user guide.
These legends alert reader on special information such as tips, notes and warnings.
| The more information icon indicates any additional tips users can consider while using Equipment Manager application. |
| A light bulb icon indicates a special tip or advanced knowledge for users to take note of. |
| The exclamation mark icon indicates any warnings that users can take note of while using Equipment Manager application. |
3. Quick Start
To get Equipment Manager up and running, simply follow these few steps.
3.1. Setting up of Equipment Manager
-
Ensure you have Java version
9or later installed in your Computer. -
Download the latest
equipmentmanager.jarhere. -
Copy the file to the folder you want to use as the home folder for your Equipment Manager.
-
Double-click the file to start the app. The Graphical User Interface (GUI) should appear in a few seconds.
3.2. Graphical User Interface (GUI)
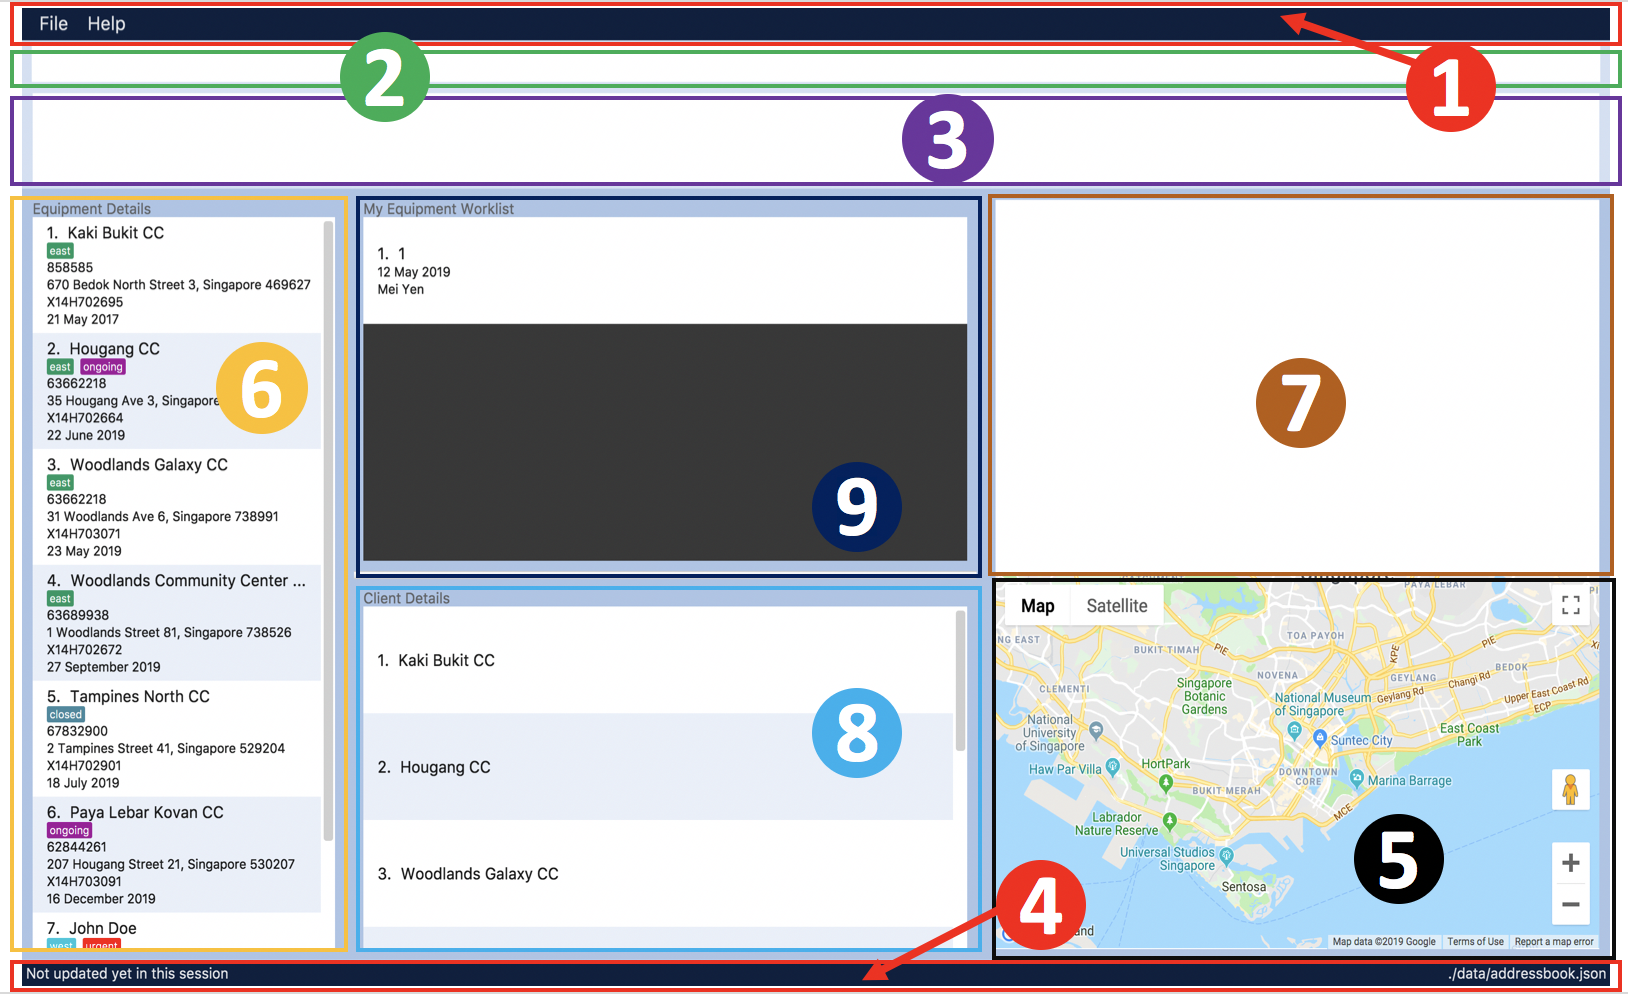
The GUI for Equipment Manager as shown in Figure 1, “A total of nine regions to note in our GUI” consists of nine regions:
Regions of Application |
Purpose |
[1] Menu Bar |
Allow users to click |
[2] Command Box |
User enters the command in the command box. Refer to User Guide to learn all the available commands. |
[3] Message box |
The message box that shows the result after a command has been executed. |
[4] Status Bar |
Show the total number of equipment in the Equipment Manager. |
[5] Google Map |
Google map serves as a visual representation for where equipment are at as well as showing user the possible routes to take. |
[6] Equipment Details panel |
This panel shows summarized details on equipment |
[7] Equipment Details Page |
This is a HTML page where it shows more detailed information on an equipment. |
[8] Client Details panel |
This panel shows specifically information related to client such as the name and how many equipment the client owns. |
[9] My Work List panel |
This panels shows the work schedule of a person when the user assigns equipment whom the user want to carry out preventive maintenance work. |
| Please remember the naming convention for the different regions in GUI as they will be used to explain when explaining Equipment Manager. |
3.3. About Equipment Parameters
Parameters |
Description |
Things to Note |
NAME |
The client’s name who owns the equipment. |
Name should only contain alphanumeric characters and spaces, and it should not be blank. |
PHONE |
The contact number of the client that owns the equipment. |
Phone numbers should only contain numbers, and it should be at least 3 digits long |
DATE |
The due date for which maintenance work on the equipment should be carried out by then. |
Should only contain numbers and hyphens, no blanks allowed. The correct format is dd-MM-yyyy. For example, 03-05-2019 which means 3 May 2019. |
ADDRESS |
The address of the client that owns the equipment. |
|
SERIAL_NUMBER |
The serial number of an equipment |
All equipment have unique serial number and there should not be duplicated serial number. |
3.4. Entering a command
Type the command in the Command Box and press Enter to execute it.
Some basic commands you can try to get started:
-
help: opens up user guide -
list-e: lists all equipment details -
add-en/Clementi CC p/67762517 pm/01-05-2019 a/220 Clementi Ave 4, Singapore 129880 Rd s/X14DH9283: adds a contact namedClementi CCto the Equipment Manager. -
delete-e3: deletes the 3rd equipment detail shown in the current list -
exit: exits the app
| Refer to Section 4, “Features” for details of each command. |
4. Features
Command Format
-
Words in
UPPER_CASEare the parameters to be supplied by the user e.g. inadd-e n/NAME,NAMEis a parameter which can be used asadd-e n/Clementi CC. -
Items in square brackets are optional e.g
n/NAME [t/TAG]can be used asn/Clementi CC t/urgentor asn/Clementi CC. -
Items with
… after them can be used multiple times including zero times e.g.[t/TAG]…can be used ast/friend,t/friend t/familyetc. -
Parameters can be in any order e.g. if the command specifies
n/NAME p/PHONE,p/PHONE n/NAMEis also acceptable.
4.1. Viewing help : help
This command opens up the User Guide in a separate window and shows all the available commands. It also teaches you how to use them effectively.
Format: help
| You can view help by click the `Help button on the Menu Bar. |
If it is your first time reading this, then good job on opening the User Guide!
4.2. Adding an equipment: add-e
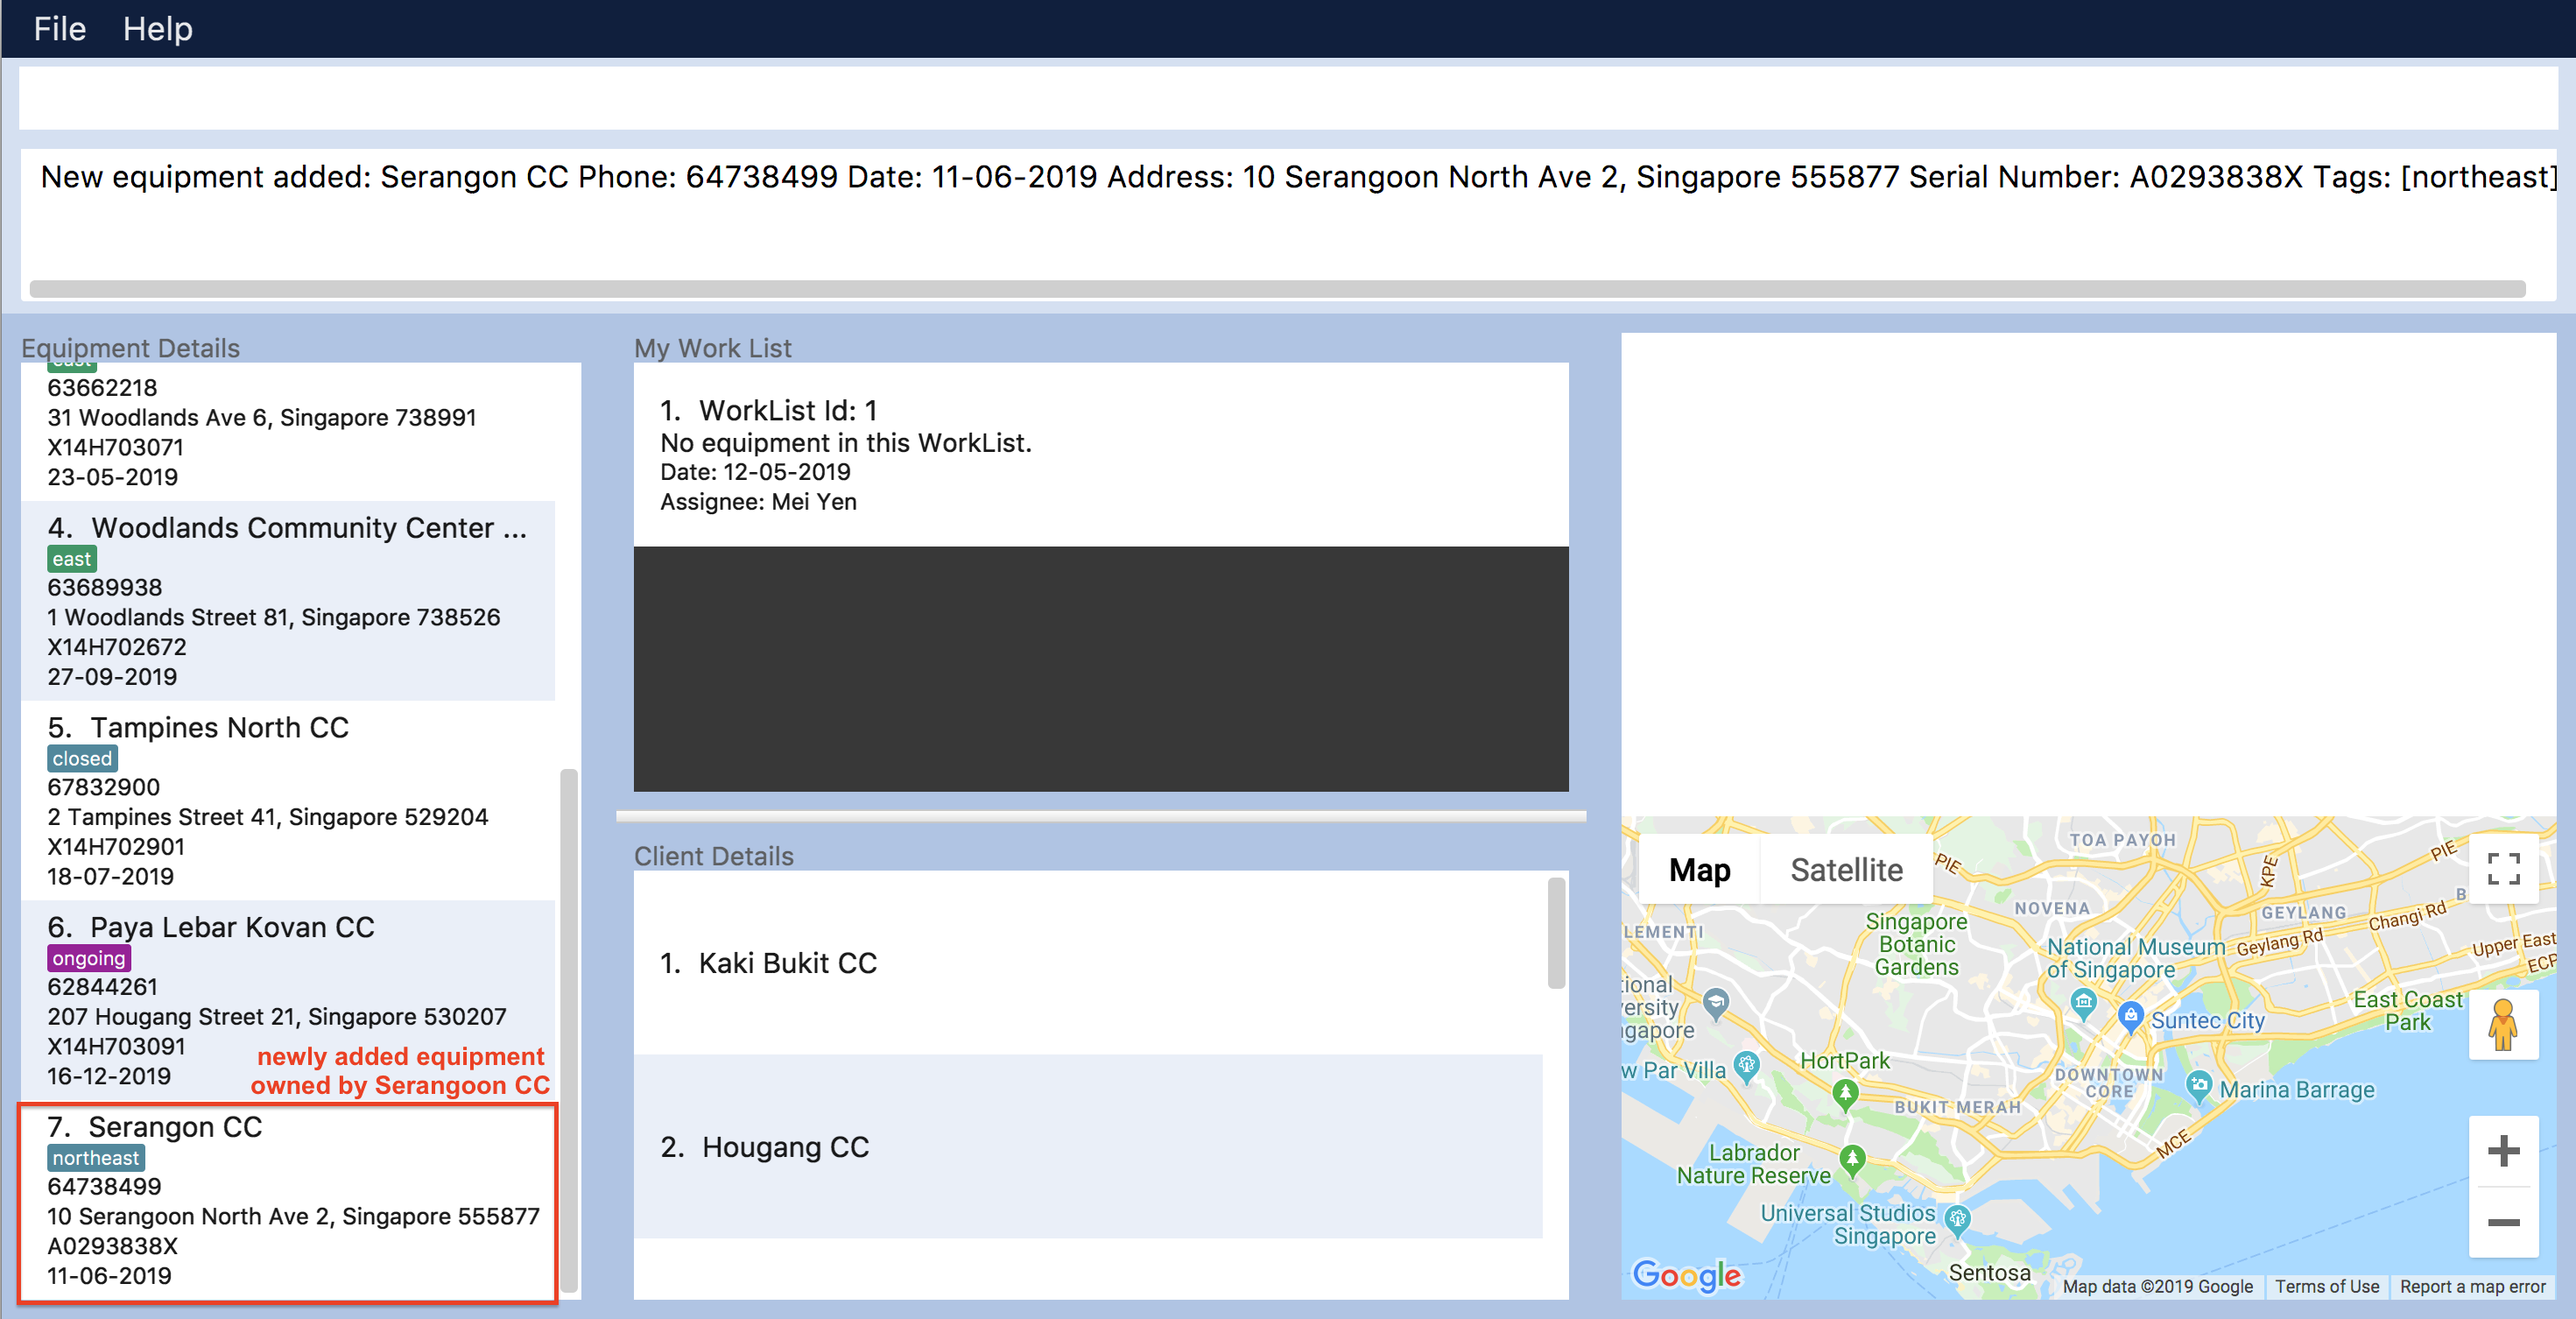
Adds an equipment to the Equipment Manager. The result of adding an equipment will be reflected on the panel labelled under Equipment details and Client details.
Format: add-e n/NAME p/PHONE pm/DATE a/ADDRESS s/SERIAL_NUMBER t/TAG
| Refer to Section 3.3, “About Equipment Parameters” to understand each equipment’s parameter when adding an equipment detail. |
| Equipment that has overdue preventative maintenance dates are allowed to be added for tracking purposes. |
|
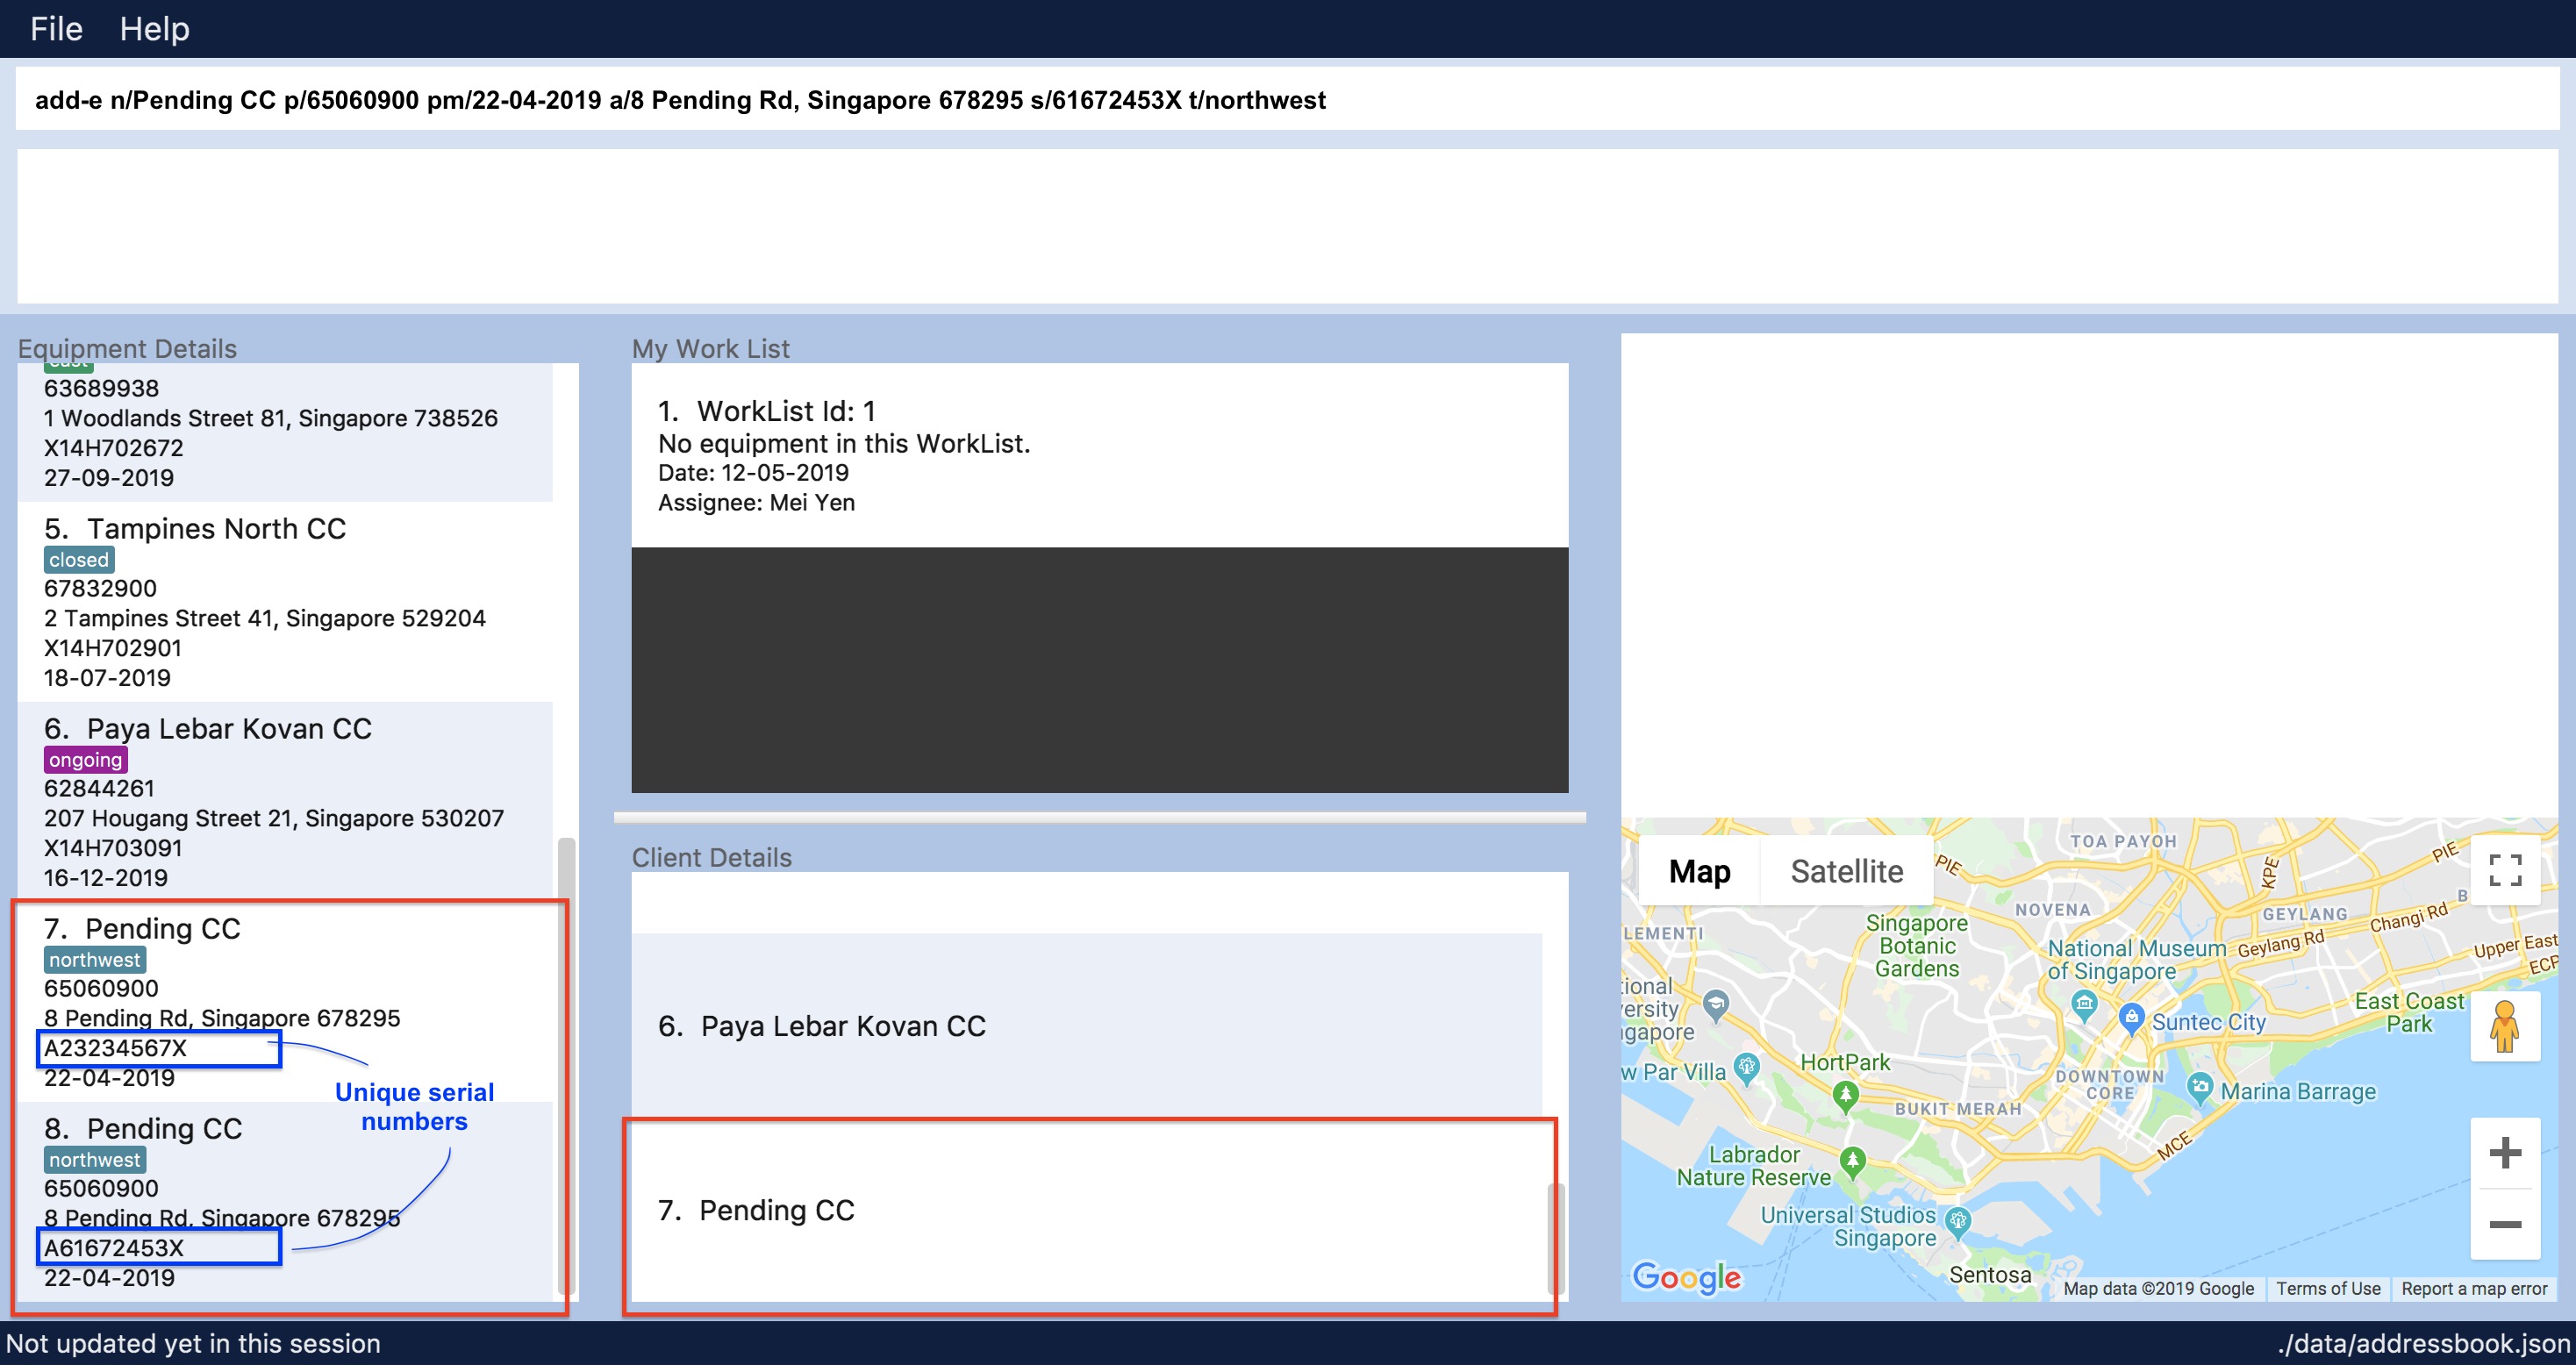
As seen in Figure 3, “UI Result after adding 2 equipment owned by the same client” below, under Equipment details panel, duplicated client details such as name, phone, address could be added and displayed because the details refer to a client’s details who owns multiple equipment as long as the serial numbers of equipment are different. Under Client details panel, duplicated client names will not appear in the panel because the Client details panel will only show distinct number of clients in the Equipment Manager. |
Example:
The following shows user adding 1 equipment that is owned by the client called Serangoon CC.
-
add-e n/Serangoon CC p/64738499 pm/11-06-2019 a/10 Serangoon North Ave 2, Singapore 555877 s/A0293838X t/northeast
The following shows user adding 2 equipment that are owned by the same client called Pending CC.
Under Equipment details panel, 2 equipment of the same name Pending CC are displayed. Only the serial number is different which indicates 2 different equipment owned by Pending CC.
Under Client details panel, Pending CC is added to the panel after entering the add-e command.
-
add-e n/Pending CC p/65060900 pm/22-04-2019 a/8 Pending Rd, Singapore 678295 s/A23234567X t/northwest
add-e n/Pending CC p/65060900 pm/22-04-2019 a/8 Pending Rd, Singapore 678295 s/61672453X t/northwest
4.3. Creating a new work list: add-w
Create a worklist in the Equipment Manager by giving the worklist an ID
Format: add-w d/DATE a/ASSIGNEE i/ID
| The user can enter multiple assignees, but only one date and id. |
| ID number beginning with 0 is not valid, for example, 002 should be 2. |
Example:
-
add-w d/09-05-2019 a/Mary i/13
4.4. Putting an equipment into a work list: put
Adds an equipment into a working list in the Equipment Manager
Format: put i/WorkListID s/SERIAL_NUMBER
| Please make sure that the respective Equipment and WorkList exist in the equipment manager. |
Example:
-
put i/1 s/A008866X
4.5. Removing an equipment from a work list: remove
Removes an equipment from a working list in the Equipment Manager
Format: remove i/WorkListID s/SERIAL_NUMBER
| Please make sure that the respective Equipment and WorkList exist in the equipment manager. |
Example:
-
remove i/1 s/A008866X
4.6. Editing an equipment: edit-e
Edits an existing equipment in the Equipment Manager.
Format: edit INDEX n/NAME p/PHONE pm/DATE a/ADDRESS s/SERIAL_NUMBER t/TAG…
-
Edits the equipment at the specified INDEX. The index refers to the index number shown in the Equipment details panel. The index must be a positive integer 1, 2, 3, …
-
At least one of the optional fields must be provided.
-
Existing values will be updated to the input values.
-
When editing tags, the existing tags of the equipment will be removed i.e adding of tags is not cumulative.
-
You can remove all the equipment’s tags by typing t/ without specifying any tags after it.
Examples:
-
edit 1 n/Clementi Community Center
Edits the client’s name of the 1st equipment to Clementi Community Center. -
edit 1 p/91234567 a/220 Clementi Ave 4
Edits the client’s phone number and address of the 1st equipment to be 91234567 and 220 Clementi Ave 4 respectively. -
edit 2 n/Hougang CC t/
Edits the client name of the 2nd equipment to be Huogang CC and clears all existing tags.
4.7. List all equipment: list-e
Shows a list of all equipment in the Equipment Manager. The result will be displayed in the panel labelled under Equipment details.
Format: list-e
Example:
-
list-e
4.8. List all work list: list-w
Shows a list of all work list in the Equipment Manager
Format: list-w
Example:
-
list-w
4.9. Selecting an equipment: select
Selects the equipment identified by the index number used in the displayed equipment list. The address of the equipment will be shown as marker on the map. The details of the equipment will be shown together with the map in split window format, means top half the screen will be showing the details, and the bottom half of the screen will be showing the map.
Format: select INDEX
-
Selects the equipment and loads the equipment at the specified INDEX.
-
The index refers to the index number shown in the displayed equipment list.
-
The index must be a positive integer 1, 2, 3, …
Examples:
-
list-e
select 2
Selects the 2nd equipment in the equipment manager. -
find Clementi
select 1
Selects the 1st equipment in the results of the find command.
4.10. Selecting a client: select-c
Selects the client identified by the index number used in the displayed client list panel. All the equipment owned by the client will be displayed under Equipment details panel.
Format: select-c INDEX
-
Selects the client at the specified INDEX and loads the client’s equipment in the Equipment details panel.
-
The index refers to the index number shown in the Client details panel.
-
The index must be a positive integer 1, 2, 3, …
Examples:
-
select 2
Selects the 2nd client in the equipment manager.
4.11. Show in map: display
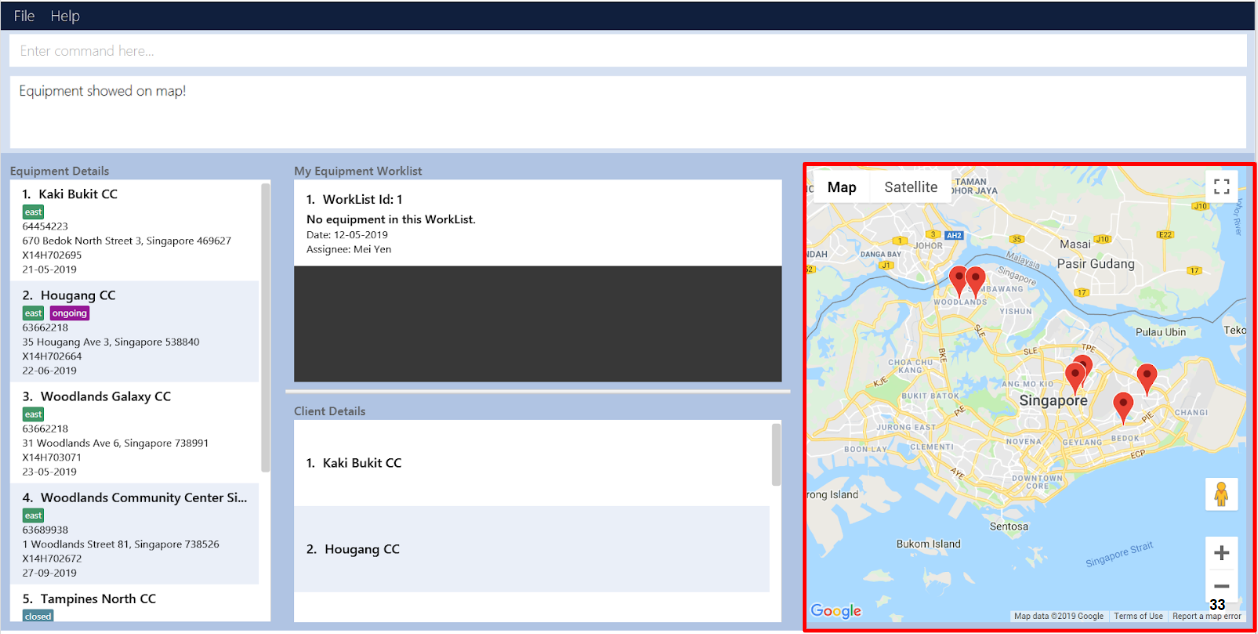
Display entries on the list to the map. Addresses of the equipment will be taken to plot marker on map.
Format: display
Example:
-
display
|
The addresses (address of equipments and the origin address) will be interpreted to match Google Map data.
The |
Screen shot after typing command display:
4.12. Sorting the equipment list: sort
Sort the equipment list.
Format: sort [FIELD_NAME to be sorted by]
The user can sort the equipment list with specified field.
The sort parameters are case-insensitive.
By default, sort sorts the list by name in lexicographical order.
Equipment list can only be sorted by name, date, phone and serial.
|
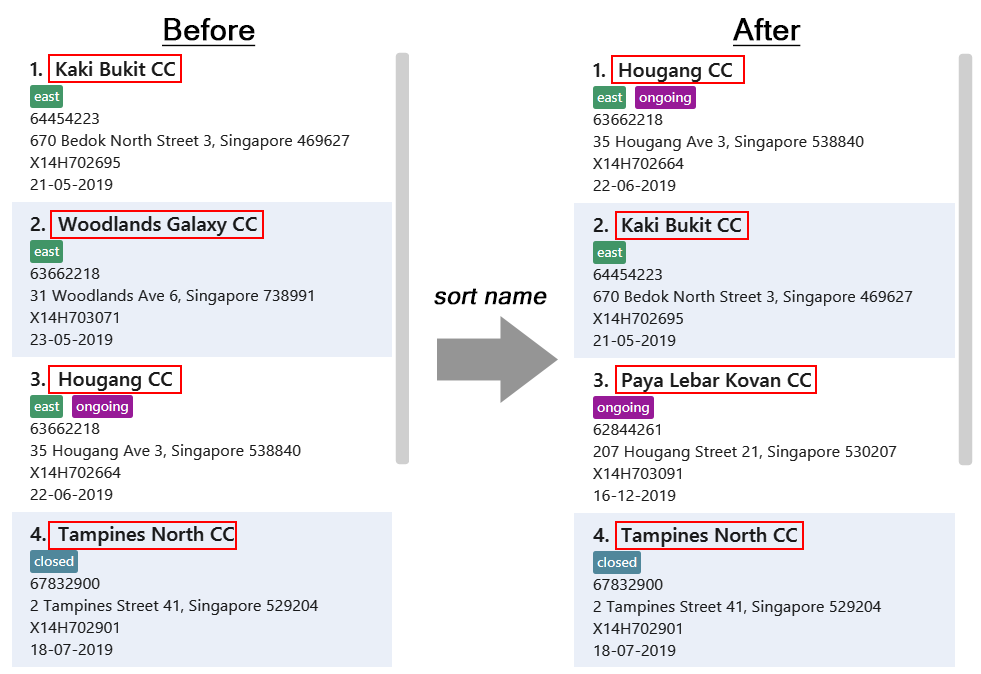
For example,
-
sort name
Returns the list sorted in alphabetical order of the client’s name.
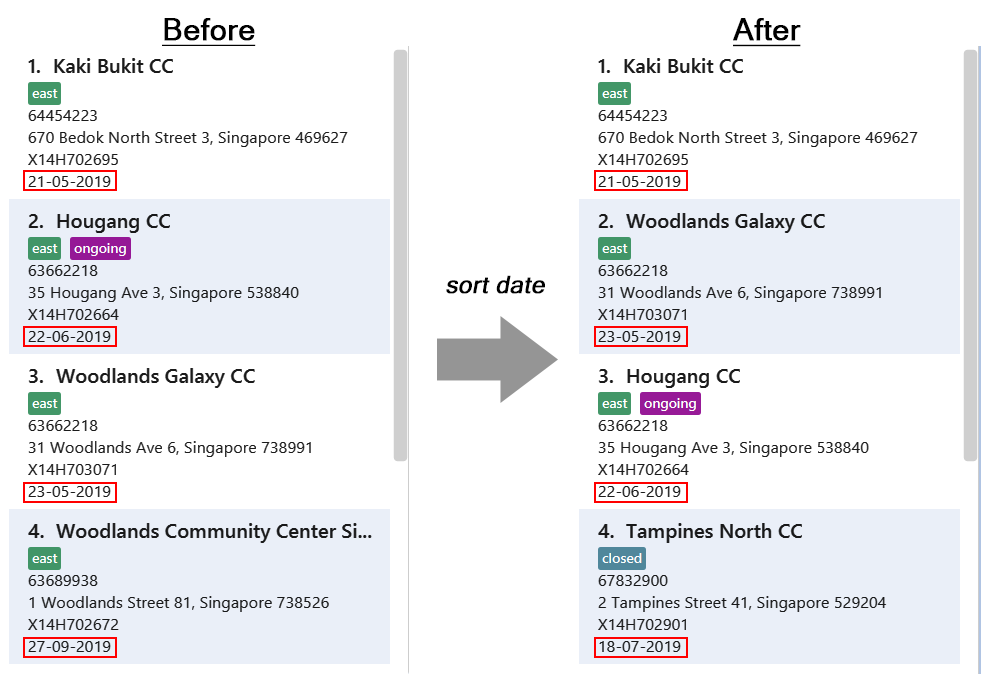
-
sort date
Returns the list sorted in an ascending order of the preventative maintenance date of the equipment.
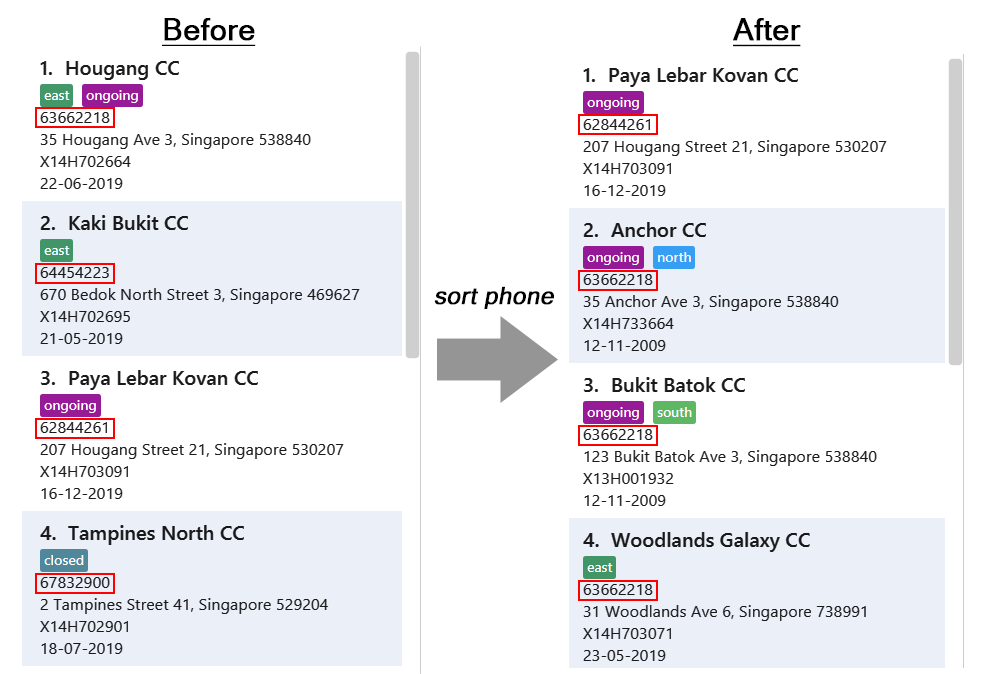
-
sort phone
Returns the list sorted by phone number of the client.
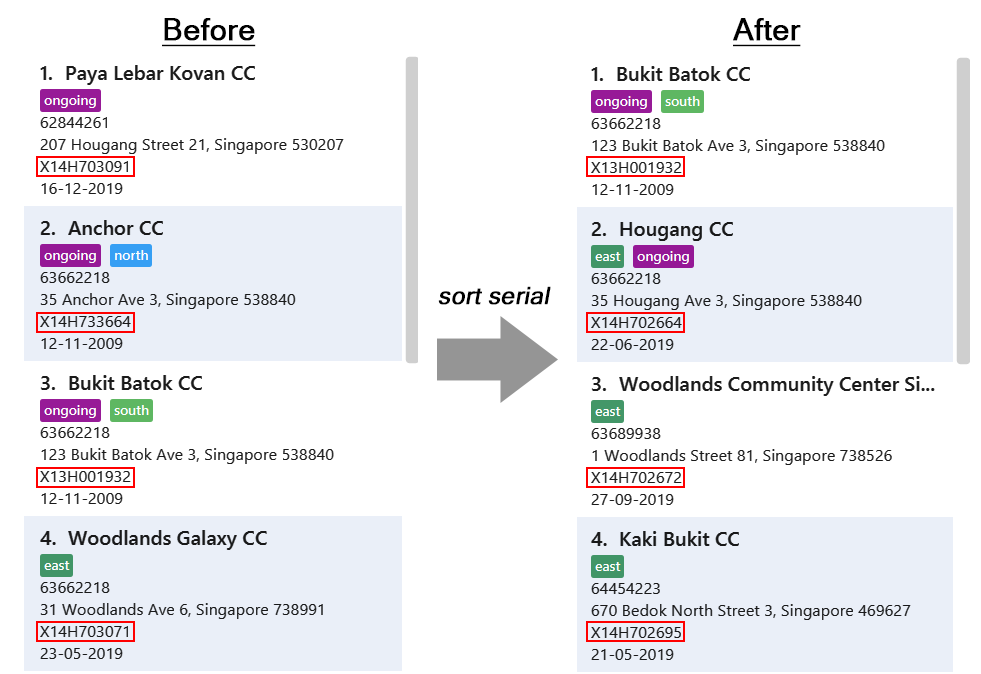
-
sort serial
Returns the list sorted by serial number of the equipment.
|
This command only works on the overall equipment list and not the current shown equipment list. |
4.13. Filtering the equipment list: filter
Filter the current shown list which match the given keywords.
Format: filter [n/NAME_KEYWORD]…[t/TAG_KEYWORD]…[a/ADDRESS_KEYWORD]
-
At least one keyword must be provided.
-
Filtering multiple keywords of the same prefix will return equipment whose attribute corresponding to the prefix contain any one of the keywords.
-
Filtering with keywords of different prefixes will return only equipment that matches with any of the keywords of the different prefixes.
-
The filter is case insensitive, e.g. hougang will match Hougang.
-
The user can filter the equipment list with any specified fields, and can filter by multiple fields and keywords.
|
This command only works on the overall equipment list and not the current shown equipment list. |
For example,
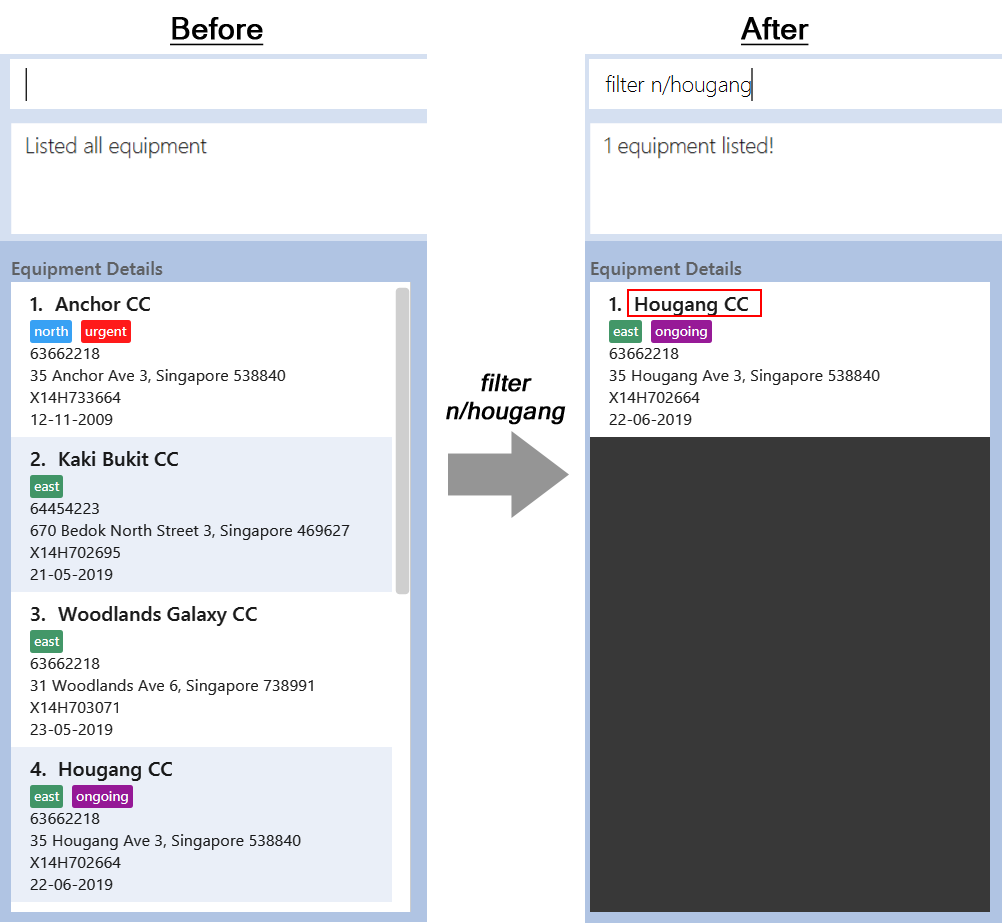
-
filter n/hougang
Returns any equipment whose name consists of 'hougang'.
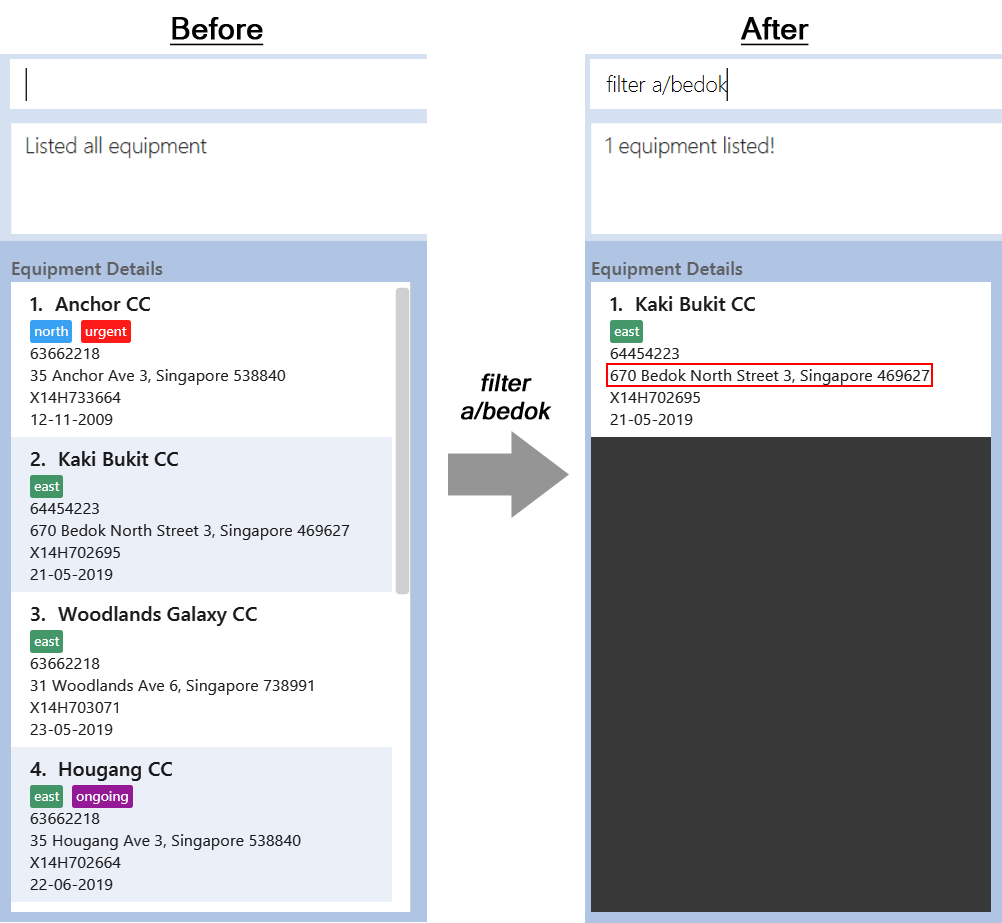
-
filter a/bedok
Returns any equipment whose address consists of 'bedok'.
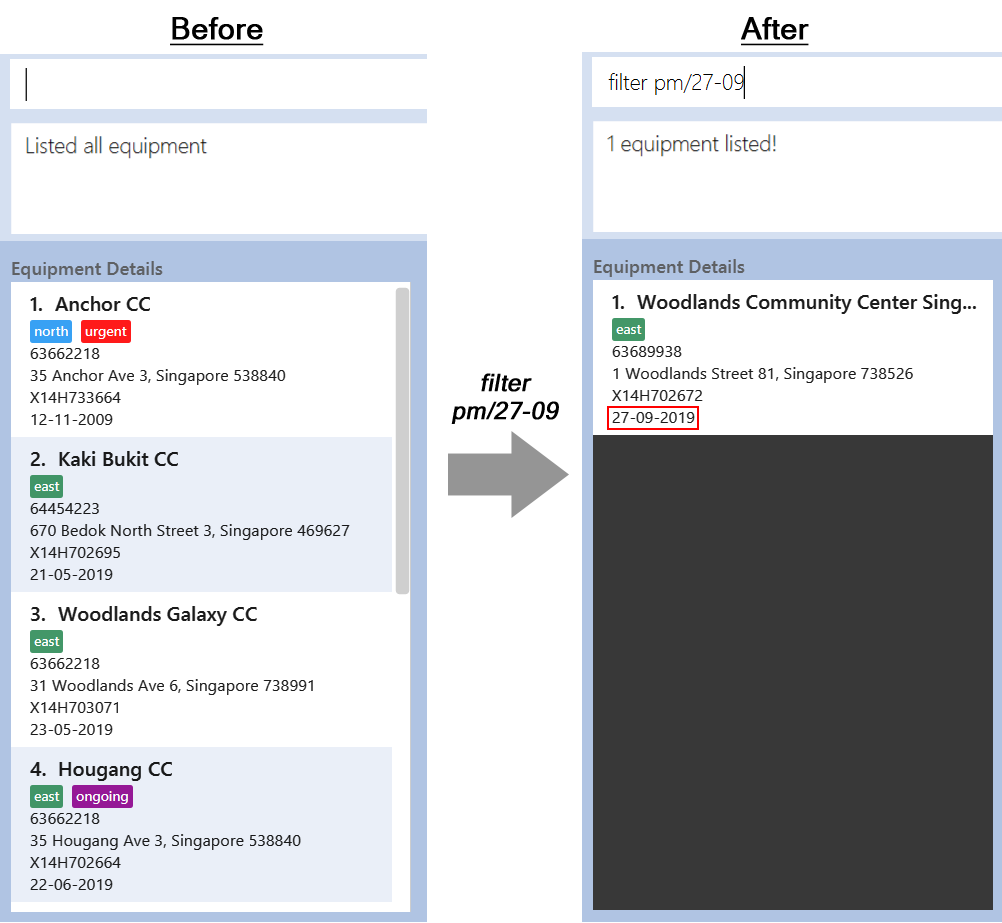
-
filter pm/27-09
Returns any equipment whose preventative maintenance date consists of '27-09'.
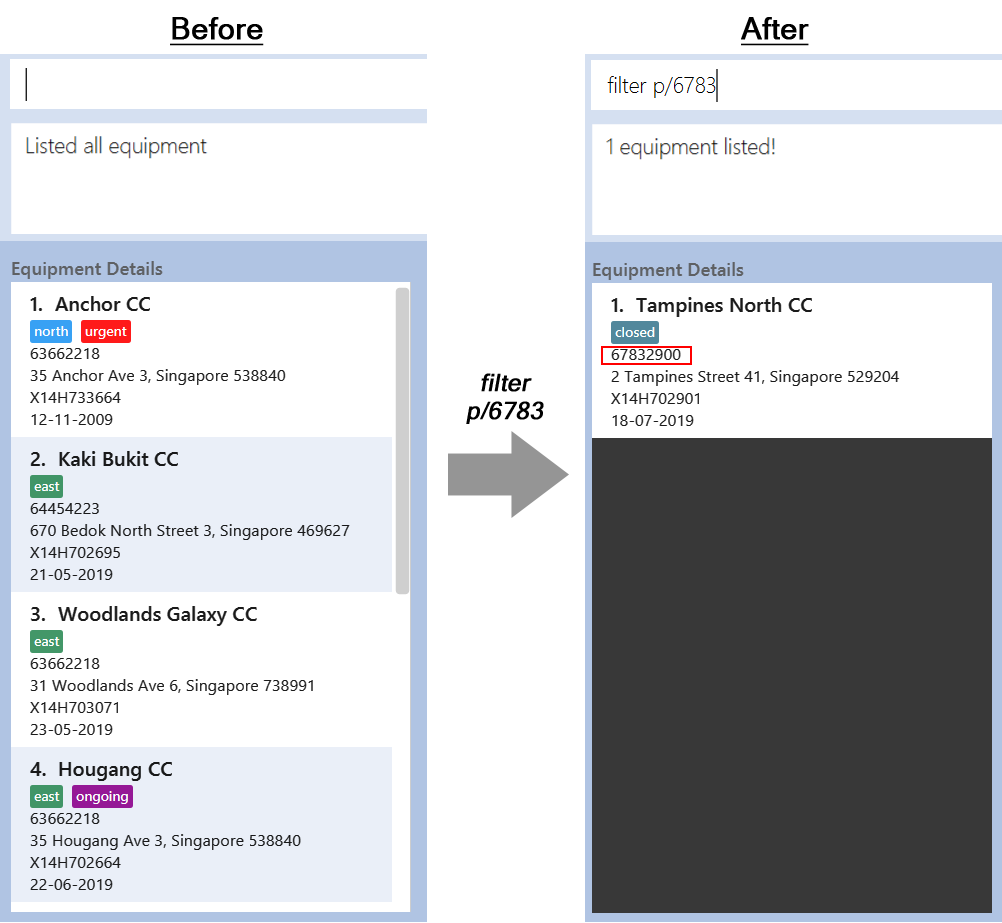
-
filter p/6783
Returns any equipment whose phone number consists of 6783.
-
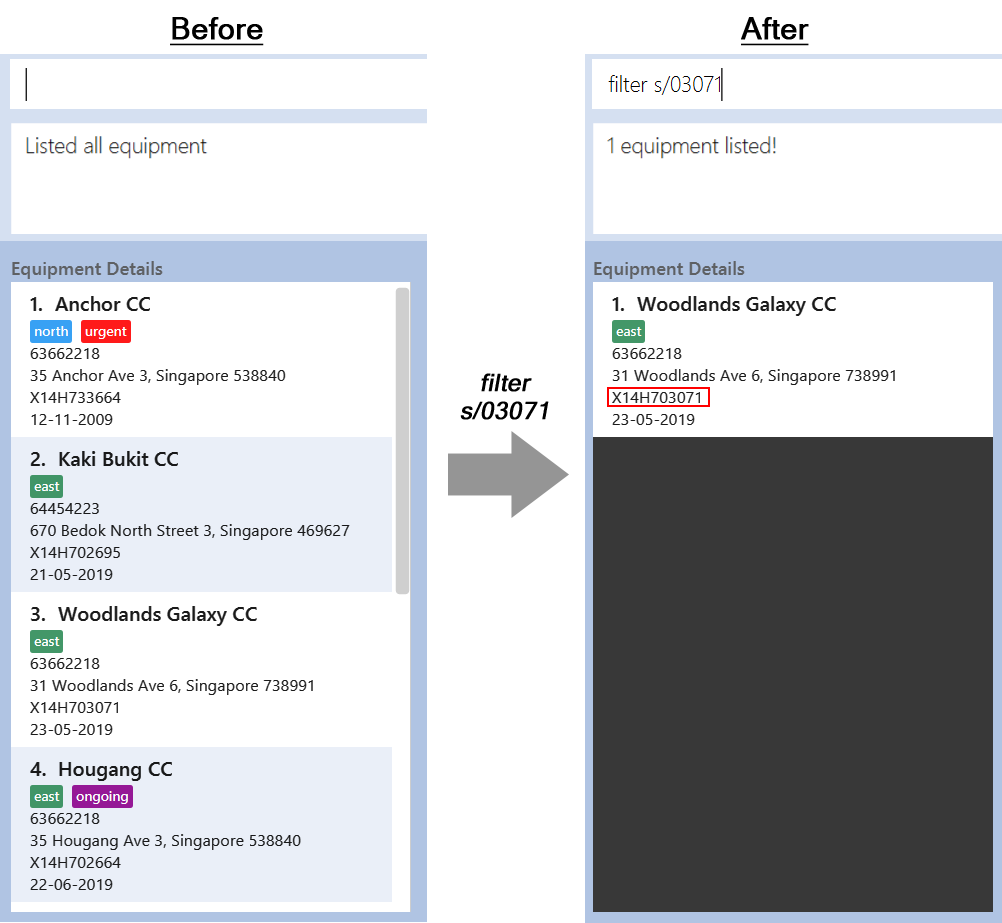
filter s/03071
Returns any equipment whose serial number consists of 03071.
-
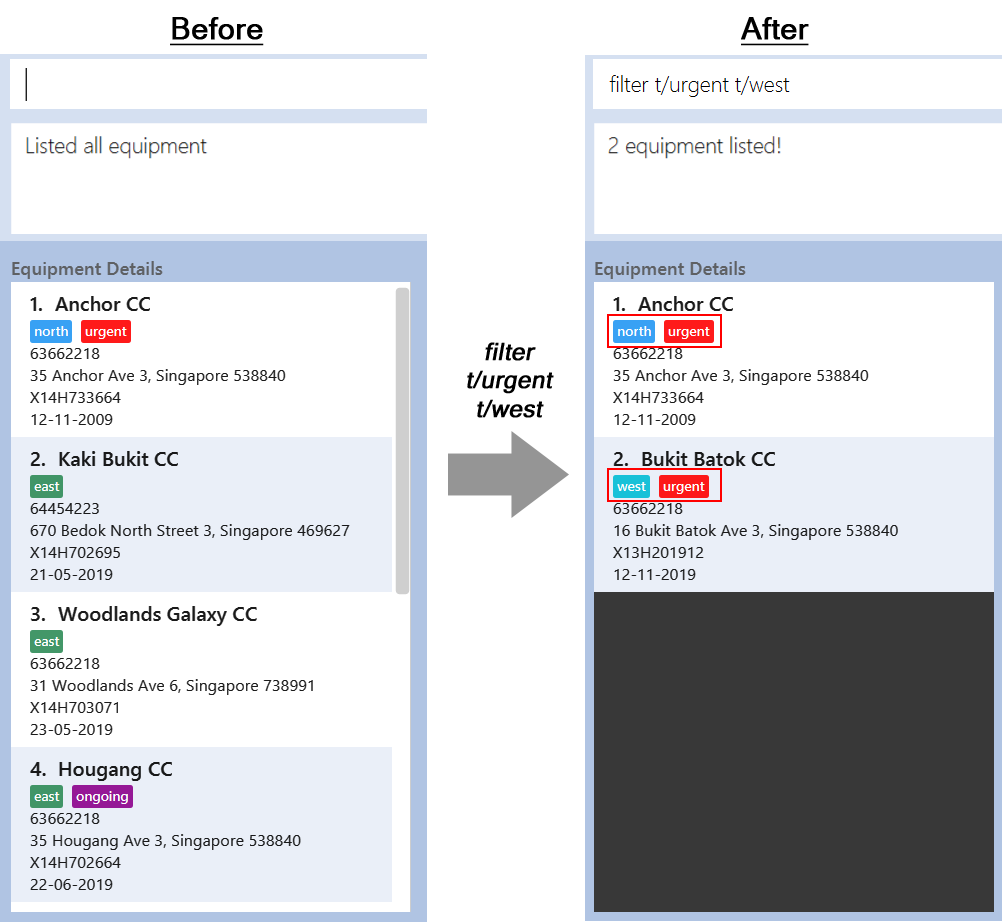
filter t/urgent t/west
Returns any equipment details whose tags consists of urgent or west.
-
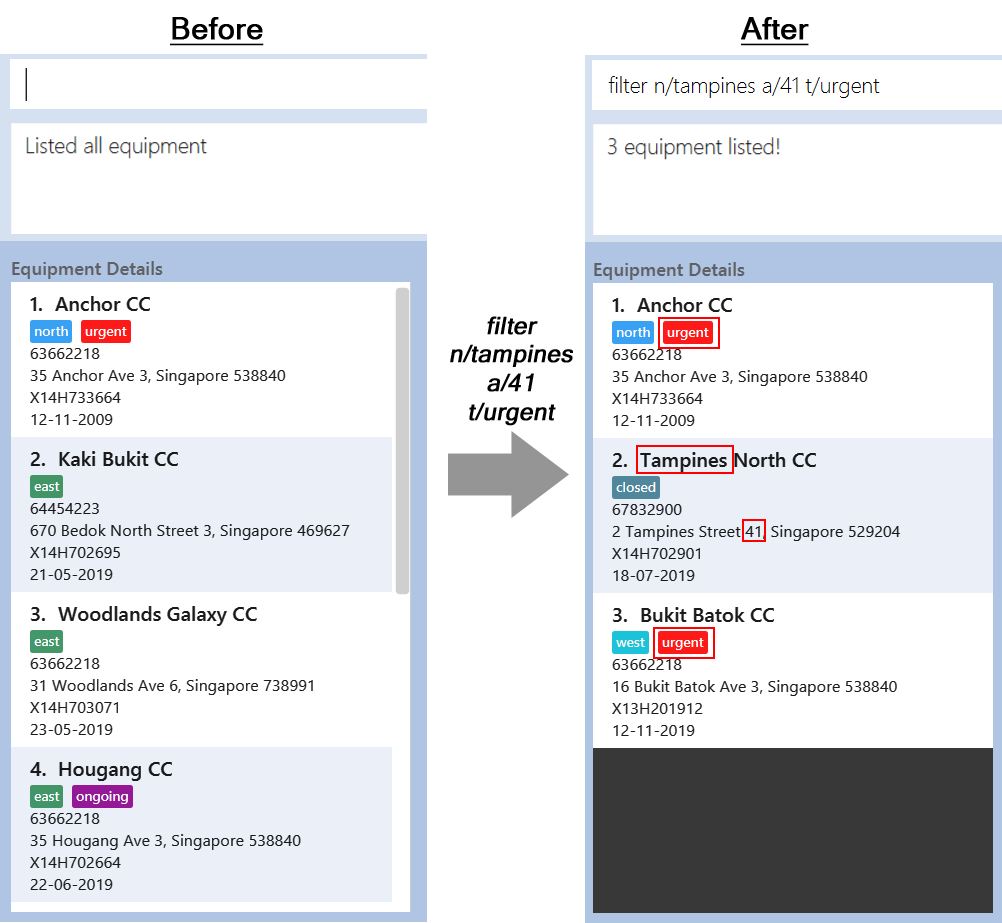
filter n/tampines a/41 t/urgent
Returns any equipment details that either consists of tampines, address that consists of 41, or whose tags consists of urgent.
4.14. Autocomplete: tab [Coming in v2.0]
If you have forgotten how to type a command, do not worry! By typing in the first letter of the command in the command and pressing the tab key, it will display the full format of the command.
4.15. Deleting an equipment: delete-e
Deletes the specified equipment from the equipment list and the whole details contained under the equipment specified by INDEX
Format: delete-e INDEX
Example:
-
list-e
delete-e 1
4.16. Deleting a work list: delete-w
Deletes the specified work list from the work list.
Format: delete-w INDEX
Example:
-
list-w
delete-w 12
4.17. Enabling notification: notify [Coming in v2.0]
Notifies you when an equipment is due for preventive maintenance in 2 days. You can choose to get notifications or not.
4.18. Route planning: route
With multiple destinations that you plan to visit for preventive maintenance, using the route command can return you with the following details:
Format: route [origin address]
Examples:
-
list-w
route School of Computing, NUS, Singapore 117417
|
The addresses (address of equipments and the origin address) will be interpreted to match Google Map data.
The |
Screen shot after typing command route School of Computing, NUS, Singapore 117417:
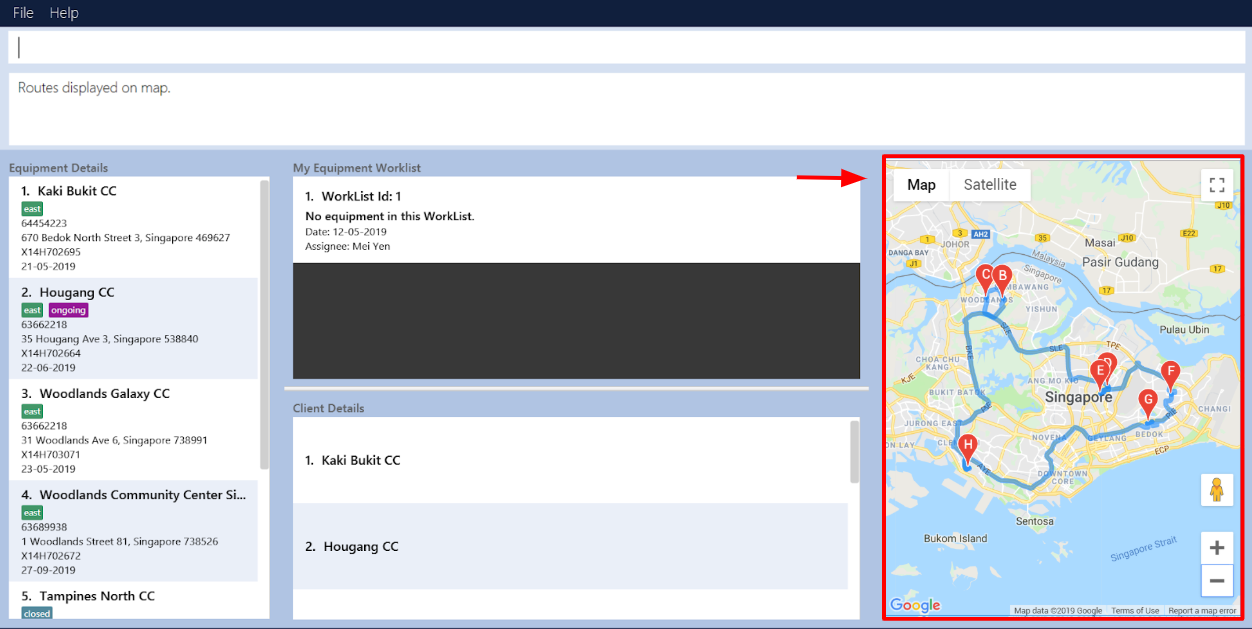
4.19. Listing entered commands: history
Lists all the commands that you have entered in reverse chronological order.
|
Pressing the ↑ and ↓ arrows will display the previous and next input respectively in the command box. |
4.20. Undoing previous command: undo
Restores Equipment Manager to the state before the previous undoable command was executed.
|
Undoable commands: those commands that modify the equipment manager’s content ( |
Examples:
-
delete-e 1
list-e
undo(reverses thedelete-e 1command) -
select-e 1
list-e
undo
Theundocommand fails as there are no undoable commands executed previously. -
delete-e 1
clear
undo(reverses theclearcommand)
undo(reverses thedelete-e 1command)
4.21. Redoing all the previously undone command: redo
Reverses the most recent undo command.
Format: redo
Examples:
-
delete-e 1
undo(reverses thedelete-e 1command)
redo(reapplies thedelete-e 1command) -
delete-e 1
redo
Theredocommand fails as there are noundocommands executed previously. -
delete-e 1
clear
undo(reverses theclearcommand)
undo(reverses thedelete-e 1command)
redo(reapplies thedelete-e 1command)
redo(reapplies theclearcommand)
4.22. Clearing all entries: clear
If you want to clear out all the client or equipment details in Equipment Manager, you can use the clear command. For example, clear all clients or clear all equipment.
Format: clear
4.23. Exit the program: exit
When you are done with Equipment Manager, type exit command to exit the application. You can also click on the close button above the menu bar to exit
Format: exit
4.24. Saving the data
Equipment Manager data are saved in the hard disk automatically after any command that changes the data.
There is no need to save manually.
4.25. Encrypting data files [coming in v2.0]
{explain how the user can enable/disable data encryption}
5. FAQ
Q: How do I transfer my data to another Computer?
A: Install the app in the other computer and overwrite the empty data file it creates with the file that contains the data of your previous Equipment Manager folder.
6. Glossary
Unsure of a few technical terms? We got you covered. Refer to Table 1, “Technical Terms” below.
| Term | Explanation |
|---|---|
Preventive Maintenance |
A maintenance work that is regularly performed on a piece of equipment to lessen the likelihood of it failing. It is performed while the equipment is still working so that it does not break down unexpectedly. |
Autocomplete |
Provides suggestions while you type into the field. |
Google Maps |
It is a online map service provided by Google. |
Mainstream Operating System (OS) |
Windows, Linux, Unix and OS-X are operating systems used widely in the world. |
User Interface (UI) |
Allows the user to interact with the application through inputs and outputs of data. |
7. Command Summary
This is the last section of the User Guide, but the most useful if you just want a list of commands to try. Refer to Table 2, “General Commands” for a summary of all the commands with quick command format guide. For more details on what each command does, please refer to Section 4, “Features”.
| Command | Format | Example |
|---|---|---|
Help |
help |
help |
Adding an equipment |
add-e n/NAME p/PHONE_NUMBER pm/DATE a/ADDRESS s/SERIAL_NUMBER t/TAG |
add-e n/Clementi CC p/67762517 pm/10-06-2019 a/220 Clementi Ave 4, Singapore 129880 s/A008844L t/west |
Creating a new Work List |
add-w d/DATE a/ASSIGNEE i/ID |
add-w d/09-05-2019 a/Mei Yen i/13 |
Putting an equipment into work list |
put i/WorkListID s/SERIAL_NUMBER |
put i/1 s/A008812X |
Removing an equipment from work list |
remove i/WorkListID s/SERIAL_NUMBER |
remove i/1 s/A008866X |
Editing an equipment |
edit INDEX n/NAME p/PHONE pm/DATE a/ADDRESS s/SERIAL_NUMBER t/TAG… |
edit 1 n/Clementi Community Center |
List all equipment |
list-e |
list-e |
List all work list |
list-w |
list-w |
Selecting an Equipment or work list |
select INDEX |
select 1 |
Selecting a client |
select-c INDEX |
select-c 2 |
Show equipment location(s) in map |
display |
display |
Route planning |
route /[worklist id] |
route 120 |
Sort the equipment list |
sort [FIELD_NAME to be sorted by] |
sort name |
Filtering the equipment list |
filter [n/NAME_KEYWORD]…[t/TAG_KEYWORD]…[a/ADDRESS_KEYWORD] |
filter n/hougang |
Deleting an equipment |
delete-e INDEX |
delete-e 1 |
Deleting a work list |
delete-w INDEX |
delete-w 2 |
Listing entered commands |
history |
history |
Undoing previous commands |
undo |
undo |
Redoing all the previously undone command |
redo |
redo |
Clearing all entries |
clear |
clear |
Exit the program |
exit |
exit |