Introduction
Hi visitor! I am Yiqun, the author of this page.
I am a Year 2 Computer Science student in National University of Singapore (at the time of Apr 2019). This is the Personal Project Portfolio (PPP) of my CS2103T Software Engineering project. In this PPP I will showcase some of my learning outcomes and contributions to you. To tell the truth, I really spent a lot effort in this project, but I am very happy to see all the achievements I have made from my hard work. I believe you are the same, right?
Overview
-
Equipment Manager is a desktop equipment information management system used for technicians and engineers who need to do maintenance or manage equipments. It allows users to keep track of equipment information, and plan their work.
-
The user interacts with it using mainly a CLI (command line interface). It also has a GUI (graphical user interface) to serve as secondary approach for users to interact with the application, also as the primary approach to display information. The GUI is build with JavaFX, and the whole application is mainly build with Java, except for the static pages to display equipment details and maps.
This project is morphed from AddressBook-Level4.
Summary of contributions
-
Code contributed: Project Code Dashboard
-
Enhancement 1: added the map display feature
-
What it does: allows the user to view equipments on the map displayed on the right hand side of the application window.
-
Justification: The display feature adds great value to the project in the following aspects:
-
This feature is one of the major selling points of this project.
-
The map make this application unique from ordinary information management tools like Excel, which cannot visualize information like address.
-
-
Highlights: The implementation of this feature involves in many technical decisions, including choosing the way to display map (built in or browser), choosing the map JavaScript library, choosing the message passing approach, choosing the way to host static pages and etc. Although number of line of code is not very large, this feature involves in a lot of learning and knowledge.
-
-
Enhancement 2: added the route feature
-
What it does: allows the user to see the efficient routes between multiple locations.
-
Justification: This feature is the "highest level" feature of the project, which is unique to this project, and also the innovation point. This help users increase productivity, cut transportation costs, improve maintenance services.
-
Highlights: This feature is the hardest feature to implement among all features in this project, because many aspects are involved. There are many technical decisions need to made, and many learning, testing, trail and error need to be made to get to this feature. This involves not only Java, but also JavaScript, HTML, CSS, and knowledge of computer networking, algorithm.
-
-
Enhancement 3: added the equipment detail split screen display feature
-
What it does: allows the user to view the equipment details and equipment location on map together.
-
Justification: This feature allows user to view the map and equipment details at the same time. The map gives the user a visual representation of the address of the address. So the user does not need to use any map application to search the equipment address.
-
Highlights: This feature is straight forward (just click and view). The user experience is good as the information is organized clearly and neatly.
-
-
Other contributions:
-
Project management:
-
Managed releases
v1.2on GitHub. (Releases v1.2) -
Managed releases
v1.3on GitHub. (Releases v1.3)
-
-
Documentation:
-
Remove header of original project for project website: #48
-
Drafting first version of UG and DG on Google Docs.
-
Editing the
User storiescomponent of DG.
-
-
Community:
-
Tools:
-
Modify the Gradle automation script to auto publish the static pages into gh-pages branch. (#45)
-
-
Contributions to the User Guide
Given below are some example sections I contributed to the User Guide. They showcase my ability to write documentation targeting end-users. |
Route planning: route
With multiple destinations that you plan to visit for preventive maintenance, using the route command can return you with the following details:
Format: route [origin address]
Examples:
-
list-w
route School of Computing, NUS, Singapore 117417
|
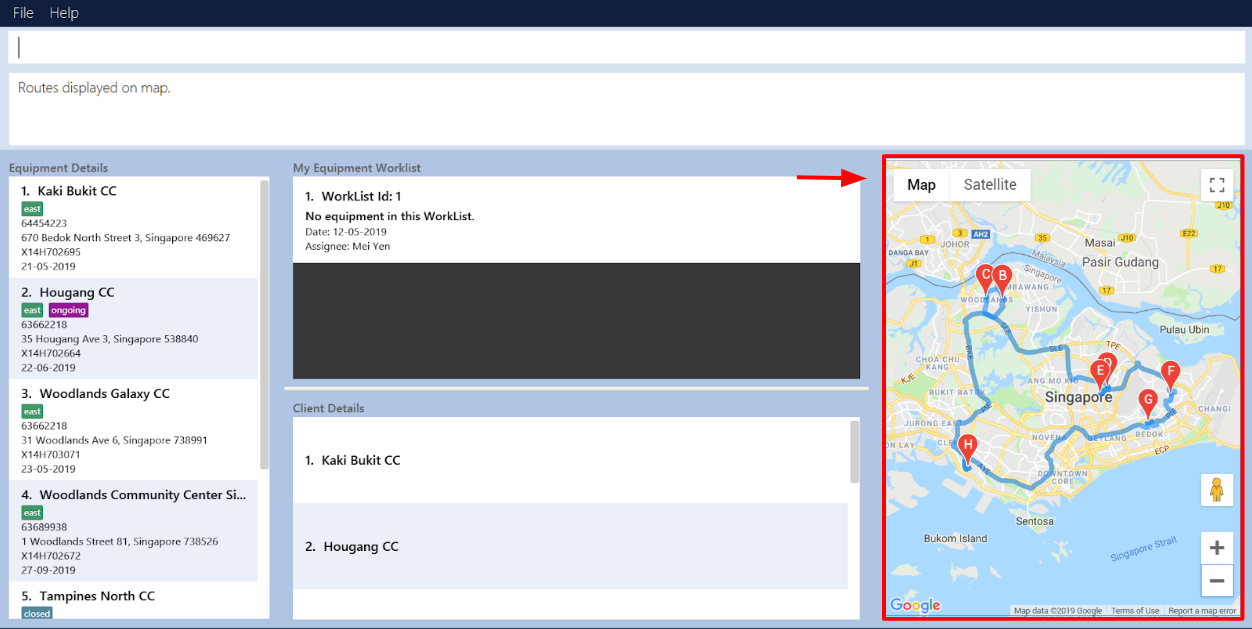
The addresses (address of equipments and the origin address) will be interpreted to match Google Map data.
The |
Screen shot after typing command route School of Computing, NUS, Singapore 117417:
More contribution to User Guild here: display
Contributions to the Developer Guide
Given below are some example sections I contributed to the Developer Guide. They showcase my ability to write technical documentation and the technical depth of my contributions to the project. |
Display feature
The display feature allow users to view the location of all equipment in the current shown list on map.
Current Implementation
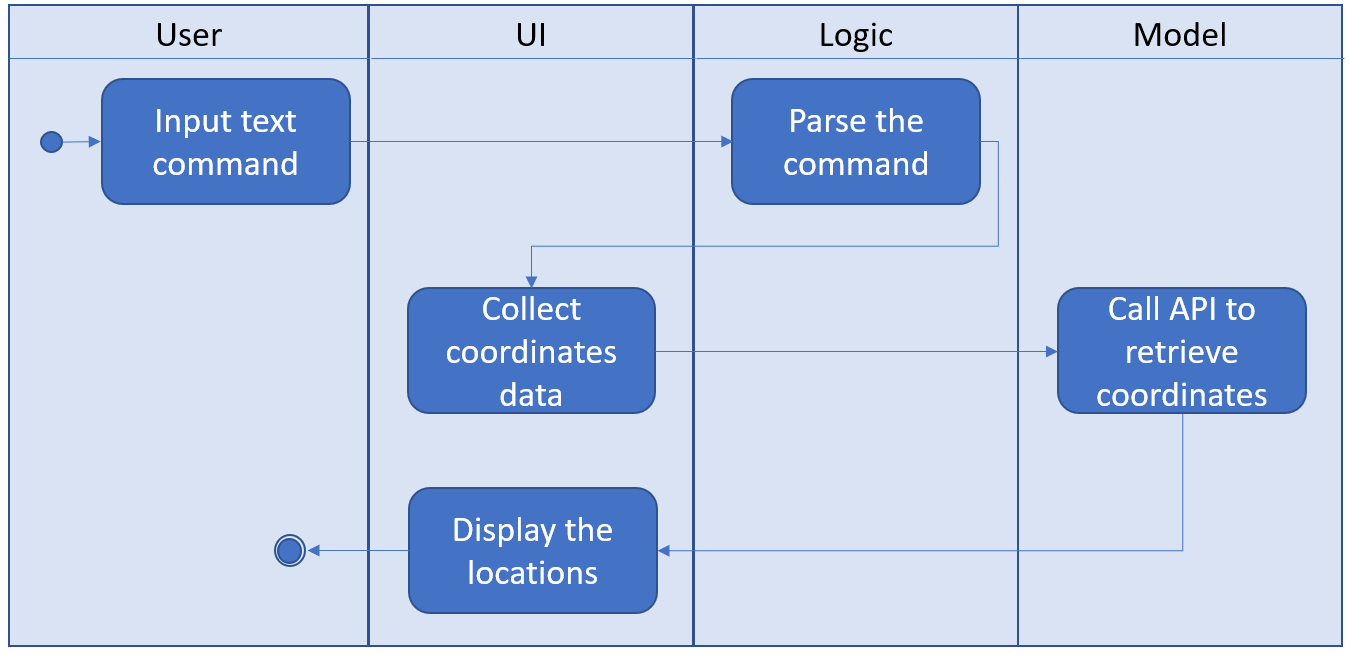
The following activity diagram shows each action is done by which component.
The following sequence diagram shows how the display operation works:
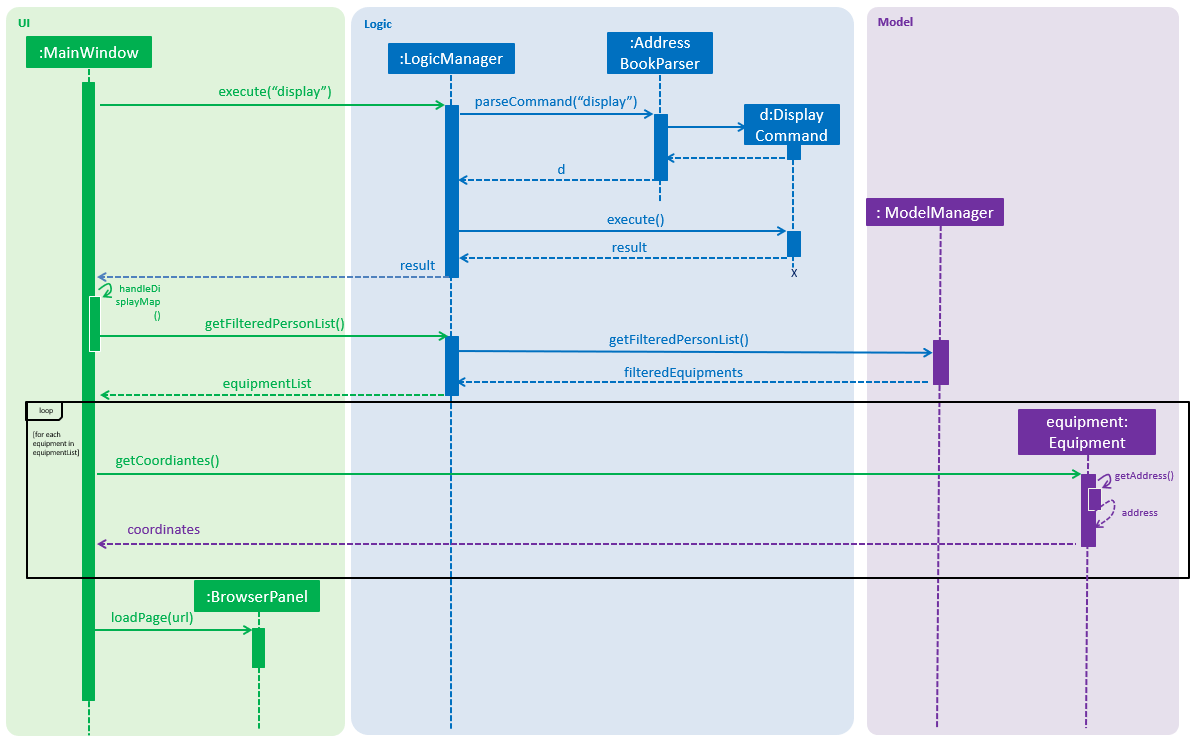
Step 1. The user launches the application, the list of equipment will show in UI and stored in the Model.
Step 2. The user executes display command to show all the equipment on the map. The execution of display command will return a CommandResult indicating display which can be checked by CommandResult#isDisplayMap(). The MainWindow will check if the CommandResult is a display map command. Then MainWindow#handleDisplayMap will be called. MainWindow#handleDisplayMap will call Logic#getFilteredPersonList() to get the equipment list, and then call Equipment#getCoordiantes() on each equipment to get its coordinates.
Step 3. The Equipment#getCoordiantes() calls to Google Map Geocoding API with the address returned by Equipment#getAddress(). The API will return the coordinates of the address. This will be returned as the coordinates of the equipment. The coordinates will be stored for future use.
Google Map Geocoding API is not free to use. You need to have your own API key to use the API. You may check Google Map Platform - Geocoding Service
|
Step 4. The coordinates are constructed to form a URL and call a web page in BrowserPanel to display the map. Currently the map is stored as /docs/staticpages/DisplayGmap.html which will be copied and published by Travis CI robot to github pages. You may either use your own github pages URL by changing BrowserPanel#MAP_MULTIPLE_POINT_BASE_URL to your own github pages URL, or use the current URL published by CS2103-AY1819S2-W10-3 team.
Step 5. The webpage receive the coordinates in parameter form. It will first parse the parameters. The standard form of parameters is ?coordinates=[[1.3012,103.1233], [1.4323, 103.2012]]&otherfields=["abc", "def"]. The number of elements in other parameters must match the number of elements in the coordinates parameter. The map may be extended to handle more functions, however the current parameter parser can only handle parameters in this standard format. For now, only coordinates are used, other parameters will be ignored.
Design Considerations
Aspect: How to display the base map
-
Alternative 1 (current choice): Use separate web page, pass the coordinates as parameters.
-
Pros: Easy to implement. Flexible to add more functions. Many JavaScript libraries can be used.
-
Cons: Unexpected behaviors would happen if the WebEngine cannot display the web page properly.
-
-
Alternative 2: Use third party JavaFX map libraries.
-
Pros: No unexpected behaviors, and more consistent running on different platforms.
-
Cons: Harder to implement, less flexibility, and limit to extensions.
-
Aspect: Which JavaScript Map library to use
-
Alternative 1 (current choice): Use Google Map JavaScript API
-
Pros: Easy to embed other Google Map APIs, and work better with JavaFX built in browser.
-
Cons: Harder to customize the style of map, marker and etc. (Compared to
Alternative 2)
-
-
Alternative 2: Use MapBox GL JS.
-
Pros: Easy to have customized view, better looking themes.
-
Cons: Works bad in JavaFX default built in browser, and harder to cooperate with Google API.
-
Aspect: Call Geocoding API to get coordinates in main application or built in browser
-
Alternative 1 (current choice): In main application
-
Pros: Addresses are reusable, i.e. only need to call
Geocoding APIonce for each equipment. -
Cons: Harder to make the function call, and increase the hang up time when many equipments do not have coordinates retrieved.
-
-
Alternative 2: In built in browser with JavaScript
-
Pros: User will get instant response and see the base map after entering the command, although the actual display will come later.
-
Cons: Addresses will not be reusable, each time user enter
displaywould callGeocoding APIfor each equipment and incur high API costs.
-
Route feature
The route feature allow users to know the best order to traverse through all equipments listed in the equipment panel. The order will be shown on the map.
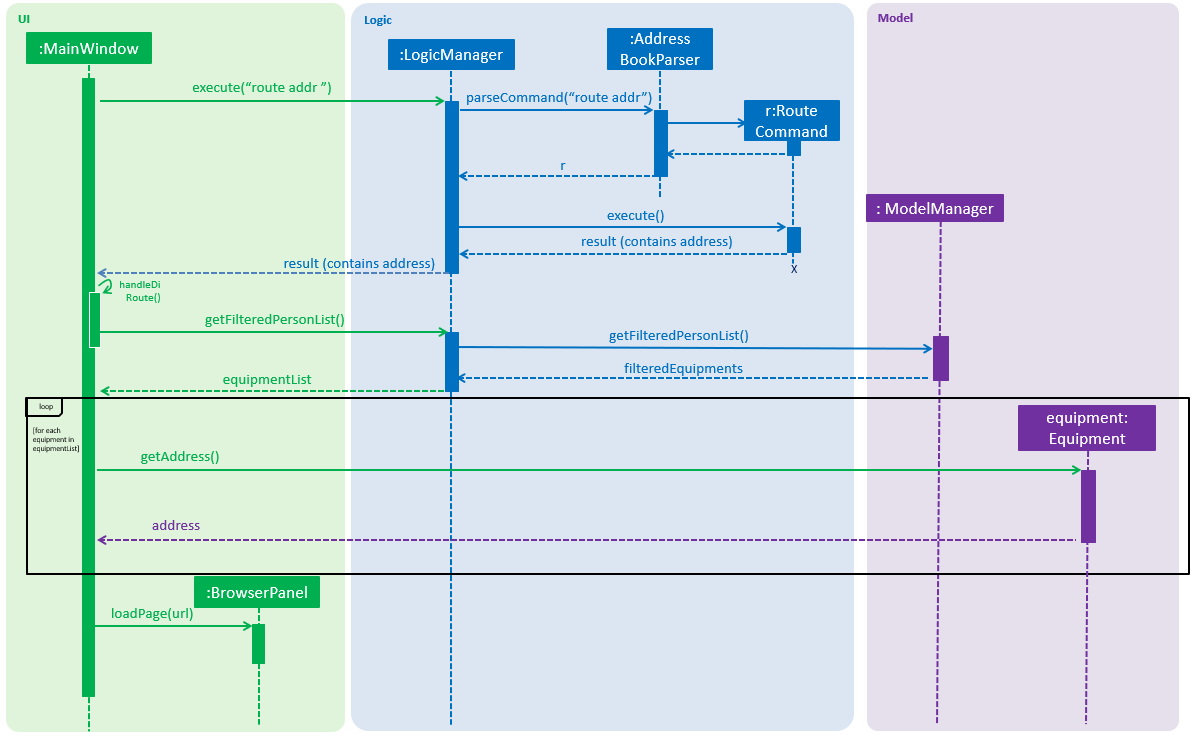
The following sequence diagram shows how the display operation works:
Current Implementation
Step 1. The user launches the application, the list of equipments will show in UI and stored in the Model.
Step 2. The user executes route command together with the origin address to display the route starting from the origin address, travel through all equipments, and go back to the origin address. The execution of route command will return a CommandResult indicating this is an route command which can be checked by CommandResult#isRoute(). The CommandResult also contains start address parameter called routeAddress of Address type. The MainWindow will check if the CommandResult is a route command. Then MainWindow#handleRoute will be called.
Step 3. MainWindow#handleRoute will call Logic#getFilteredPersonList() to get the equipments list, and then call Equipment#getAddress() on each equipments to get its address.
Step 4. The addresses are constructed to form a URL and call a web page in BrowserPanel to display the map. Currently the map is stored as /docs/staticpages/DisplayRoutes.html which will be copied and published by Travis CI robot to github pages. You may either use your own github pages URL by changing BrowserPanel#MAP_ROUTE_BASE_URL to your own github pages URL, or use the current URL published by CS2103-AY1819S2-W10-3 team.
Step 5. The web page receive the addresses in parameter form. It will first parse the parameters. The standard form of parameters is ?address=["Address 1", "Address 2"]&start="Origin address"&end="Destination address". The order of parameters does not matter.
Step 6. The JavaScript code in the web page will call Google Map JavaScript API to calculate the best route to each addresses, and display the route on the map.
Google Map JavaScript API is not free to use. You need to have your own API key to use the API. You may check Google Map Platform - Maps JavaScript API
|
Design Considerations
Aspect: Passing addresses or coordinates to web page
-
Alternative 1 (current choice): Passing addresses to web page
-
Pros: Better accuracy, as addresses would interpreted more accurately than coordinates when involving routing.
-
Cons: Worse data reusability, waste API calls, because the data retrieved from the
Google Map JavaScript APIcannot be send back to the main application and stored.
-
-
Alternative 2: Passing coordinates to the web page
-
Pros: Save some API calls.
-
Cons: Worse accuracy.
-
Calling Google Map JavaScript API to retrieve the route is much more expensive than calling Geocoding API to retrieve the coordinates. Thus, it is fair to prioritize to utilize function of Google Map JavaScript API to retrieve the route.
|
Aspect: How to pass the origin address to UI
-
Alternative 1 (current choice): Passing as a parameter in
CommandResult-
Pros: Minimal code changes.
-
Cons: Need to create more constructor of
CommandResult, and it may get harder to understand the usage of these constructors.
-
-
Alternative 2: Storing as a field in
Model-
Pros: Easier to understand and use.
-
Cons: Require more code changes because changing
Modelinterface will break many classes and tests.
-
Aspect: How to pass extra parameters to CommandResult
-
Alternative 1 (current choice): Use overloading of the constructor
-
Pros: No need to change the caller code of the constructor, decrease the possibility of code conflicts when merging with teammates' code.
-
Cons: As more fields are added to
CommandResult, more constructors will be added. As a result, it may confuse future developers.
-
-
Alternative 2: Directly modify the
CommandResultclass and its constructor signature-
Pros: More straightaway and easier to understand.
-
Cons: Changing the constructor signature also need to change all the caller functions. So it requires changes of many classes which may bring code conflicts.
-